INTRODUCTION / OVERVIEW
Data can be migrated from one SAN disk to another in Oracle database. The below document describes the steps to migrate the data from one ASM disk to another ASM disk.
OS admin, can perform the migration if it is on the Regular File system. There is a role for a DBA to be played, when ASM comes in to picture.
The OS admin, will add the raw disks and grant the necessary permissions to the disks which are to be added.
cd /dev
ls –lart ASM*

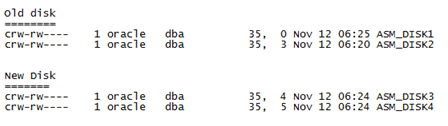
In this scenario the old disk are ASM_DISK1 and ASM_DISK2.
We have to add the new disks ASM_DISK3 and ASM_DISK4 to the ASM and remove the old ones.
- STEPS TO ADD DISK TO ASM
- Check for the Existing ASM Disks. Check whether the permissions of the disk are given correctly as oracle:dba.
Pluto8:/usr2/oracle />ls -lart /dev/ASM*

- From database level, when we query the ASM views, the disk added will be displayed in the view result. The name of the Disk Group will be specified as [CANDIDATE]. First we need to login to the ASM instance.
For Oracle 10g Version,
export ORACLE_SID=+ASM
sqlplus” / as sysdba ”
For Oracle 11g Version,
. ./.profile_grid
sqlplus /nolog
conn / as sysasm
SQL> set lines 200 pages 1000
SQL> column disk_group_name format a30
columndisk_file_path format a50
SQL> SQL> column disk_file_name format a30
SQL> column disk_file_fail_group format a30
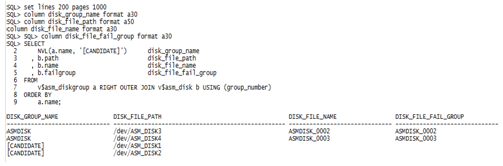
SQL> SELECT
2 NVL(a.name, ‘[CANDIDATE]’) disk_group_name
3 , b.pathdisk_file_path
4 , b.name disk_file_name
5 , b.failgroupdisk_file_fail_group
6 FROM
7 v$asm_diskgroup a RIGHT OUTER JOIN v$asm_disk b USING (group_number)
8 ORDER BY
9 a.name;
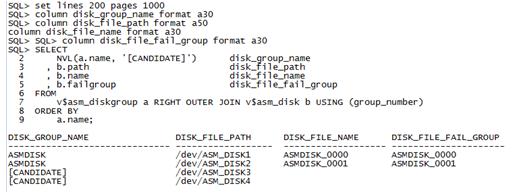
You can even check the disk info as below.,

- Add the disk to the ASM.
alterdiskgroup ASMDISK add disk ‘/dev/ASM_DISK3′,’/dev/ASM_DISK4’ rebalance power 9;

- After adding the disk to the ASM, check the free space in ASM.

- After executing the command for adding disk to the ASM, the disk will be added soon but there will be a data Re-Org processing inside the ASM. So it will take some time for it to get completed. To check the status of the process issue the below query.,
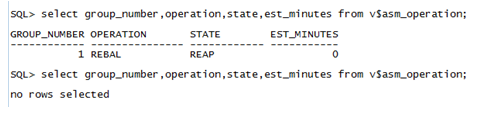
select * from v$asm_operation;
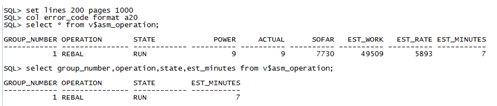
From the above result we can clearly see that there is a Rebalancing operation going on in ASM. The Estimated Time for completion is 7mins.
- Keep on checking the status of the view v$asm_operation. At one specific time the result will selects no rows. It means the disk has been successfully added to the ASM and the Rebalance of the DATA is also completed successfully.

- In the same way all the disks are added to the ASM. Check the ASM view to see the status of the Added disks.,
- STEPS TO REMOVE DISK FROM ASM
Deletion / Removal of disks are similar to the Addition of disks to the ASM. The command to remove the disk will vary.
In Migration of ASM Disk, to add a disk to the ASM we use the OS Level name of the disk, whereas while dropping / removing a disk from ASM we should specify the Database level name of the Disk. This we can get it by querying the view v$asm_diskgroup.
The below are the steps to carry out the Removal Of Disk from ASM.
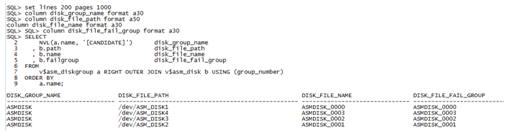
- Check the current status of the ASM.

The above is the current status of the ASM.
- To drop or remove a disk from ASM issue the below command.,
alterdiskgroup ASMDISK drop disk ASMDISK_0000,ASMDISK_0001 rebalance power 9;

- As we saw in the addition of disk, here also a Disk Re-Org or Rebalance operation will be processed.

- Wait till the Rebalance operation to complete. The view should return no rows.
- Now check the status of ASM disks,
- Once after removing the disk from the ASM, a restart of the database is required. There will be some locks existing on disks in the OS level. So OS team will be not able to remove the old disks.
- After restarting the Database inform to OS team so that they will easily remove the old Disks.
CONCLUSION
- The Migration of Data can be done Online.
- Only removal of disk needs a reboot whereas for adding disks restart of the database is not required.


 Total Users : 1900361